| 赞 | 3 |
| VIP | |
| 好人卡 | |
| 积分 | 21 |
| 经验 | |
| 最后登录 | 2025-8-7 |
| 在线时间 | 950 小时 |
- 梦石
- 0
- 星屑
- 2116
- 在线时间
- 950 小时
- 注册时间
- 2015-7-16
- 回帖
- 692

|
 发表于 2016-3-30 00:25:51
|
显示全部楼层
发表于 2016-3-30 00:25:51
|
显示全部楼层
本帖最后由 duzine 于 2016-3-30 00:33 编辑
來,少年,打開尼的雙手
收下這個腳本
[pre lang="ruby"]#------------------------------------------------------------------------------#
# Galv's Menu Layout
#------------------------------------------------------------------------------#
# For: RPGMAKER VX ACE
# Version 1.4
#------------------------------------------------------------------------------#
# 2012-11-10 - Version 1.4 - Added option to set how many actors visible
# 2012-10-19 - Version 1.3 - Fixed a bug that happened with lots of members
# 2012-10-13 - Version 1.2 - Fixed to work in all screen resolutions with some
# options to tweak position.
# 2012-10-13 - Version 1.1 - Changed to use /Pictures/ instead of /Faces/
# Seemed more appropriate as this would be used to
# draw the image as a picture in game.
# 2012-10-13 - Version 1.0 - release
#------------------------------------------------------------------------------#
# This script overwrites the default menu so the actors on the main menu screen
# are lined up horizontally and display a portrait image instead of the face.
#
# INSTRUCTIONS:
# Copy this script below materials and above main
#
# You MUST have a portrait for each actor. This was designed to work with
# the RTP potraits that you must have purchased the right stuff to use.
# These portrat images are around 270px x 290px.
# Put these portraits in the Graphics/faces/ and name them the same as the
# face graphic the actor uses, plus the position of the face in it.
# For example
# If your actor uses "Actor1" face and uses the first face in that file then
# you will name the portrait image "Actor1-1.png"
#
# Download the demo if you don't understand
#------------------------------------------------------------------------------#
#------------------------------------------------------------------------------#
# SCREEN SIZE
#------------------------------------------------------------------------------#
# This menu layout looks better on larger screen size. The below line
# increases your screen size to the max. Remove it if you don't want this.
Graphics.resize_screen(640, 480)
#------------------------------------------------------------------------------#
#------------------------------------------------------------------------------#
module Galv_Menu
#------------------------------------------------------------------------------#
# SETUP OPTIONS
#------------------------------------------------------------------------------#
CURRENCY_ICON = 361 # Icon to display instead of currency vocab.
# Change this to 0 to use currency vocab instead.
PORTRAIT_X_OFFSET = 0 # add a positive or negative number to offset
PORTRAIT_Y_OFFSET = 0 # each portrait's postion if the portraits you use
# do not line up with your screen width/height.
PORTRAIT_HEIGHT = 400 # So you can tweak the height of the portraits.
NUMBER_OF_ACTORS = 4 # number of actors visible before scrolling
#------------------------------------------------------------------------------#
# END SETUP OPTIONS
#------------------------------------------------------------------------------#
end
class Window_MenuCommand < Window_Command
def window_width
return 130
end
end
class Window_Gold < Window_Base
def window_width
return 130
end
def refresh
contents.clear
if Galv_Menu::CURRENCY_ICON > 0
draw_currency_value(value, currency_icon, 4, 0, contents.width - 25)
else
draw_currency_value(value, currency_unit, 4, 0, contents.width - 8)
end
end
def currency_icon
draw_icon(Galv_Menu::CURRENCY_ICON, contents.width - 23, -1, true)
end
end
class Window_MenuStatus < Window_Selectable
def window_width
Graphics.width - 130
end
def item_height
(height - standard_padding * 2)
end
def draw_portrait(face_name, face_index, x, y, enabled = true)
bitmap = Cache.picture(face_name + "-" + (face_index + 1).to_s)
portrait_width = bitmap.width / 3 + Galv_Menu::PORTRAIT_X_OFFSET
y_offset = Galv_Menu::PORTRAIT_Y_OFFSET
rect = Rect.new(portrait_width, -70 + y_offset, col_width + tweak, Galv_Menu::PORTRAIT_HEIGHT)
contents.blt(x, y, bitmap, rect, enabled ? 255 : translucent_alpha)
bitmap.dispose
end
def tweak
if Galv_Menu::NUMBER_OF_ACTORS <= 3
return -2
else
return 0
end
end
def draw_actor_portrait(actor, x, y, enabled = true)
draw_portrait(actor.face_name, actor.face_index, x, y, enabled)
end
def draw_item(index)
actor = $game_party.members[index]
enabled = $game_party.battle_members.include?(actor)
rect = item_rect(index)
draw_item_background(index)
draw_actor_portrait(actor, rect.x + 1, rect.y + 1, enabled)
draw_actor_simple_status(actor, rect.x, rect.y)
end
def draw_actor_simple_status(actor, x, y)
draw_actor_name(actor, x, y)
draw_actor_level(actor, x, y + line_height * 2)
draw_actor_icons(actor, x, y + Graphics.height - line_height * 5)
draw_actor_class(actor, x, y + line_height * 1)
draw_actor_hp(actor, x, y + Graphics.height - line_height * 4)
draw_actor_mp(actor, x, y + Graphics.height - line_height * 3)
draw_actor_tp(actor, x, y + Graphics.height - line_height * 2)
end
def col_width
window_width / Galv_Menu::NUMBER_OF_ACTORS - standard_padding - 2
end
def draw_actor_hp(actor, x, y, width = col_width)
draw_gauge(x, y, width, actor.hp_rate, hp_gauge_color1, hp_gauge_color2)
change_color(system_color)
draw_text(x, y, 30, line_height, Vocab::hp_a)
draw_current_and_max_values(x, y, width, actor.hp, actor.mhp,
hp_color(actor), normal_color)
end
def draw_actor_mp(actor, x, y, width = col_width)
draw_gauge(x, y, width, actor.mp_rate, mp_gauge_color1, mp_gauge_color2)
change_color(system_color)
draw_text(x, y, 30, line_height, Vocab::mp_a)
draw_current_and_max_values(x, y, width, actor.mp, actor.mmp,
mp_color(actor), normal_color)
end
def draw_actor_tp(actor, x, y, width = col_width)
draw_gauge(x, y, width, actor.tp_rate, tp_gauge_color1, tp_gauge_color2)
change_color(system_color)
draw_text(x, y, 30, line_height, Vocab::tp_a)
change_color(tp_color(actor))
draw_text(x + width - 42, y, 42, line_height, actor.tp.to_i, 2)
end
def draw_current_and_max_values(x, y, width, current, max, color1, color2)
change_color(color1)
xr = x + width
if width < 100
draw_text(xr - 40, y, 42, line_height, current, 2)
else
draw_text(xr - 92, y, 42, line_height, current, 2)
change_color(color2)
draw_text(xr - 52, y, 12, line_height, "/", 2)
draw_text(xr - 42, y, 42, line_height, max, 2)
end
end
def draw_actor_name(actor, x, y, width = col_width)
change_color(hp_color(actor))
draw_text(x, y, width, line_height, actor.name)
end
def draw_actor_class(actor, x, y, width = col_width)
change_color(normal_color)
draw_text(x, y, width, line_height, actor.class.name)
end
def visible_line_number
return 1
end
def col_max
return Galv_Menu::NUMBER_OF_ACTORS
end
def spacing
return 8
end
def contents_width
(item_width + spacing) * item_max - spacing
end
def contents_height
item_height
end
def top_col
ox / (item_width + spacing)
end
def top_col=(col)
col = 0 if col < 0
@member_count = $game_party.members.count
col = col_max + @member_count if col > col_max + @member_count
self.ox = col * (item_width + spacing)
end
def bottom_col
top_col + col_max - 1
end
def bottom_col=(col)
self.top_col = col - (col_max - 1)
end
def ensure_cursor_visible
self.top_col = index if index < top_col
self.bottom_col = index if index > bottom_col
end
def item_rect(index)
rect = super
rect.x = index * (item_width + spacing)
rect.y = 0
rect
end
def alignment
return 1
end
def cursor_down(wrap = false)
end
def cursor_up(wrap = false)
end
def cursor_pagedown
end
def cursor_pageup
end
end[/pre]
 Graphics.rar
(589.42 KB, 下载次数: 62)
Graphics.rar
(589.42 KB, 下载次数: 62)
下載後放在工程裡,就能看到效果了
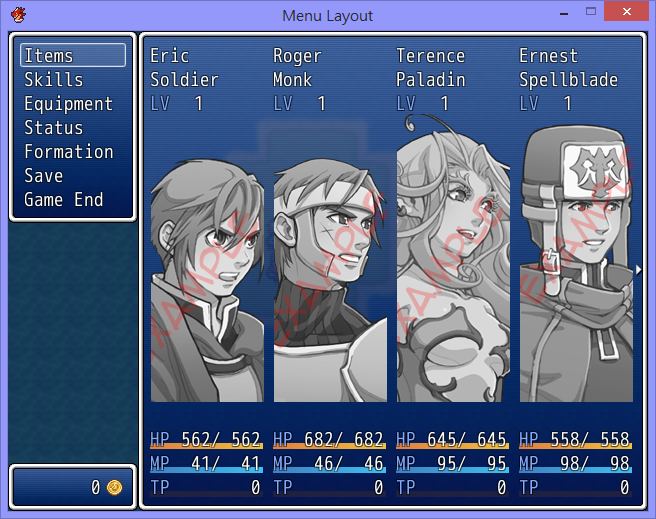
補一發圖片,應該是你要的
|
|


 写轮眼
写轮眼
 提升卡
提升卡 沉默号角
沉默号角 喧嚣号角
喧嚣号角 变色卡
变色卡 升龙剑
升龙剑


