| 赞 | 68 |
| VIP | |
| 好人卡 | |
| 积分 | 65 |
| 经验 | |
| 最后登录 | 2023-7-2 |
| 在线时间 | 119 小时 |
- 梦石
- 0
- 星屑
- 6483
- 在线时间
- 119 小时
- 注册时间
- 2020-1-8
- 回帖
- 205
|
加入我们,或者,欢迎回来。
您需要 登录 才可以下载或查看,没有账号?注册会员
×
边学边练,直接上代码
[pre lang="ruby"]class Bitmap
dll = "Blur.dll"
GetValue = Win32API.new(dll, 'GetValue', 'LLLLL', 'L')
Blur = Win32API.new(dll, 'bitmapBlur', 'LL', 'V')
ExpBlur = Win32API.new(dll, 'bitmapExpBlur', 'LLLL', 'V')
GaussBlur = Win32API.new(dll, 'bitmapGaussBlur', 'LL', 'V')
def to_int
self.object_id
end
def hBitmap
@_hBitmap ||= GetValue.call(self, 16, 8, 44, 0)
end
def pBits
@_pBits ||= GetValue.call(self, 16, 8, 16, 0)
end
def pScan0
@_pScan0 ||= GetValue.call(self, 16, 8, 12, 0)
end
def pIHr
@_pIHr ||= GetValue.call(self, 16, 8, 8, 0)
end
# 简单快速的模糊,“第一行”与“最后一行”未处理;简单的看作半径1的模糊
# 具体计算用SSE的pavgb实现
# width >= 8 && height > 3
def main_blur!(exchg_times = 0)
Blur.call(self, exchg_times)
end
# 网上的算法,效率与半径无关,纯C实现
def expBlur!(radius = 1, aprec = 16, zprec = 7)
ExpBlur.call(self, radius, aprec, zprec)
end
# 网上的算法,效率与半径无关,具体计算用内嵌汇编SSE实现
# C函数半径参数为单精度,为了避免转换类型,写成百分比数 250 => 2.5
def gaussBlur!(radius_percent = 100)
GaussBlur.call(self, radius_percent)
end
BlurEffectGuid = [0x633C80A4, 0x482B1843, 0x28BEF29E, 0xD4FDC534]
BrightnessContrastEffectGuid = [0xD3A1DBE1,0x4C178EC4,0x97EA4C9F,0x3D341CAD]
ColorBalanceEffectGuid = [0x537E597D, 0x48DA251E, 0xCA296496, 0xF8706B49]
ColorCurveEffectGuid = [0xDD6A0022, 0x4A6758E4, 0x8ED49B9D, 0x3DA581B8]
ColorLUTEffectGuid = [0xA7CE72A9, 0x40D70F7F, 0xC0D0CCB3, 0x12325C2D]
ColorLookupTableEffectGuid = ColorLUTEffectGuid
ColorMatrixEffectGuid = [0x718F2615, 0x40E37933, 0x685F11A5, 0x74DD14FE]
HSLEffectGuid = [0x8B2DD6C3, 0x4D87EB07, 0x0871F0A5, 0x5F9C6AE2]
HueSaturationLightnessEffectGuid = HSLEffectGuid
LevelsEffectGuid = [0x99C354EC, 0x4F3A2A31, 0xA817348C, 0x253AB303]
RECEffectGuid = [0x74D29D05, 0x426669A4, 0xC53C4995, 0x32B63628]
RedEyeCorrectionEffectGuid = RECEffectGuid
SharpenEffectGuid = [0x63CBF3EE, 0x402CC526, 0xC562718F, 0x4251BF40]
TintEffectGuid = [0x1077AF00, 0x44412848, 0xAD448994, 0x2C7A2D4C]
#PixelFormat32bppARGB = 0x26200A
#ImageLockModeRead = 1
#ImageLockModeWrite = 2
#ImageLockModeUserInputBuf = 4
gdip = "gdiplus.dll"
GdiplusStartup = Win32API.new(gdip, 'GdiplusStartup', 'PPP', 'I')
GdiplusShutdown = Win32API.new(gdip, 'GdiplusShutdown', 'L', 'V')
GdipStartupInput = [1, 0, 0, 0].pack('L4')
CreateBitmapFromHBITMAP =
Win32API.new(gdip, 'GdipCreateBitmapFromHBITMAP', 'LLP', 'I')
DisposeImage = Win32API.new(gdip, 'GdipDisposeImage', 'L', 'I')
# CreateEffect = Win32API.new(gdip, 'GdipCreateEffect', 'PP', 'I')
# 该API第一个参数类型Guid,可以看作一个16bytes结构,
# 需要其所有成员完全进栈,而不是其地址
# RMXP中没有此结构,所以拓展参数
CreateEffectGuidP = Win32API.new(gdip, 'GdipCreateEffect', 'LLLLP', 'I')
CreateEffect = lambda {|guid, buf|
CreateEffectGuidP.call(guid[0], guid[1], guid[2], guid[3], buf)
}
BitmapApplyEffect = Win32API.new(gdip, 'GdipBitmapApplyEffect','LLPIPP','I')
DeleteEffect = Win32API.new(gdip, 'GdipDeleteEffect', 'L', 'I')
SetEffectParams = Win32API.new(gdip,'GdipSetEffectParameters', 'LPL', 'I')
BitmapLockBits = Win32API.new(gdip, 'GdipBitmapLockBits', 'LPLLP', 'I')
BitmapUnlockBits = Win32API.new(gdip, 'GdipBitmapUnlockBits', 'LP', 'I')
# 半径越大,效率越低
def gdiplus_blur!(radius, rx = 0, ry = 0, rw = nil, rh = nil)
buf = "\0" * 4
GdiplusStartup.call(buf, GdipStartupInput, nil)
token = buf.unpack('L')[0]
CreateBitmapFromHBITMAP.call(self.hBitmap, 0, buf)
pBitmap = buf.unpack('L')[0]
CreateEffect.call(BlurEffectGuid, buf)
pBlurEffect = buf.unpack('L')[0]
# gdiplus 不同效果的效果参数结构不同,自行百度
blurParams = [radius, 0].pack('fI')
SetEffectParams.call(pBlurEffect, blurParams, blurParams.size)
w, h = self.width, self.height
rw, rh = rw || w, rh || h
rect = [rx, ry, rx + rw, ry + rh].pack('iiII')
BitmapApplyEffect.call(pBitmap, pBlurEffect, rect, 0, nil, nil)
#PixelFormat32bppARGB => 0x26200A
stride = w * -4
scan0 = self.pScan0 + rx * 4 + ry * stride
lockedBmpData = [rw, rh, stride, 0x26200A, scan0, 0].pack('IIiI3')
#ImageLockModeUserInputBuf | ImageLockModeRead => 5
BitmapLockBits.call(pBitmap, rect, 5, 0x26200A, lockedBmpData)
BitmapUnlockBits.call(pBitmap, lockedBmpData)
DisposeImage.call(pBitmap)
DeleteEffect.call(pBlurEffect)
GdiplusShutdown.call(token)
end
end[/pre]
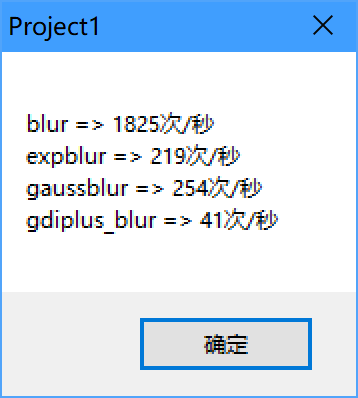
简单的测试,希望可以回复一下次数
[pre lang="ruby"]src = Bitmap.new(640, 480) # 观看效果的话,换成图片,注释掉下面一行代码
src.fill_rect(src.rect, Color.new(0, 255, 255))
dst = src.clone
sprite = Sprite.new
sprite.bitmap = dst
count, t = 0, Time.now
loop do
dst.main_blur!(1)
break if Time.now - t >= 1.0
count += 1
end
str = "blur => #{count}次/秒\n" # 195次/秒……
count, t = 0, Time.now
loop do
dst.expBlur!(2, 16, 7)
break if Time.now - t >= 1.0
count += 1
end
str << "expblur => #{count}次/秒\n" # 25次/秒……
count, t = 0, Time.now
loop do
dst.gaussBlur!(200)
break if Time.now - t >= 1.0
count += 1
end
str << "gaussblur => #{count}次/秒\n" # 47次/秒……
count, t = 0, Time.now
loop do
dst.gdiplus_blur!(5)
break if Time.now - t >= 1.0
count += 1
end
str << "gdiplus_blur => #{count}次/秒" # 8次/秒……
print str
loop do
Graphics.update
Input.update
if Input.trigger?(Input::B)
dst.clear
dst.blt(0, 0, src, src.rect)
end
if Input.trigger?(Input::C)
dst.main_blur!(1)
end
if Input.trigger?(Input::L)
dst.gaussBlur!(200)
end
if Input.trigger?(Input::R)
dst.expBlur!(2, 16, 7)
end
if Input.trigger?(Input::RIGHT)
dst.gdiplus_blur!(5)
end
end[/pre] |
评分
-
查看全部评分
|



 写轮眼
写轮眼
 发表于 2022-4-16 15:45:22


 提升卡
提升卡 沉默号角
沉默号角 喧嚣号角
喧嚣号角 变色卡
变色卡 升龙剑
升龙剑

 发表于 2022-4-16 19:23:09