| 赞 | 0 |
| VIP | |
| 好人卡 | |
| 积分 | 1 |
| 经验 | |
| 最后登录 | 2013-6-25 |
| 在线时间 | 687 小时 |
- 梦石
- 0
- 星屑
- 50
- 在线时间
- 687 小时
- 注册时间
- 2012-10-29
- 回帖
- 1526
|
 发表于 2013-3-8 16:57:42
|
显示全部楼层
发表于 2013-3-8 16:57:42
|
显示全部楼层
本帖最后由 j433463 于 2013-3-8 17:00 编辑
您也许可以试试 VX 的卷动文字脚本,例如这一个:
http://forums.rpgmakerweb.com/in ... anas-credit-script/
这网址页中就是有人询问怎么在 VA 中使用的,方式很简单,把脚本贴到 Main 之前,然后把要显示的卷动文字内容剪贴到大约 64 行的 Credit= <<_MAP_CREDIT_ 下方,
像是这样:- Credit= <<_MAP_CREDIT_
- <h>标题字
- <center>置中文字
- <left>置左文字
- <right>置右文字
- _MAP_CREDIT_
调用它的方式是 SceneManager.scene.credit.start,测试效果还不错,但需要调整 @sprite.x 的位置:
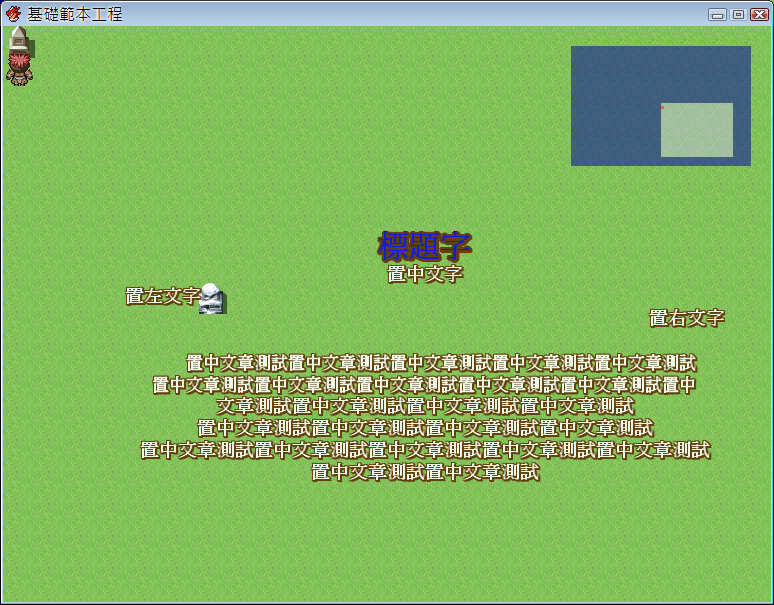
如果屏蔽看不到网页,这是脚本内容:
[pre lang="ruby" line="1"]#===============================================================
# ● [VX] ◦ Map Credit ◦ □
#--------------------------------------------------------------
# ◦ by Woratana [woratana@hotmail.com]
# ◦ Thaiware RPG Maker Community
# ◦ Released on: 09/05/2008
# ◦ Version: 1.0
#----------------------------------------------------
# ◦ How to use:
# ** To start Credit, call script:
# $scene.credit.start
#
# ** To Stop and Clear Credit, call script:
# $scene.credit.terminate
#----------------------------------------------------
# ◦ Special Tags for Decorate Text:
# There are special tags that you can put in text to decorate that line
#
# You can also set default text decoration for all text in:
#-------------------------------------
# SETUP HEADER TEXT HERE
#-------------------------------------
# for Header line (line that has tag <h>)
# &
#-------------------------------------
# SETUP CONTENT TEXT HERE
#-------------------------------------
# for Normal line~
#-----------------------------------------------------
# ◦ >= Tag List <= ◦
# * These tags will only apply to the line it is in~
# * You cannot use opposite tags in same line. (e.g. <b> and </b>)
#
# <b> :Bold Text
# </b> :No Bold Text
# <i> :Italic Text
# </i> :No Italic Text
# <center> :Align text to Center
# <left> :Align text to left
# <right> :Align text to right
# <h> :Make that line become Header line
#===========================================================================
#----------------------------------------
# Map Credit Main Script \('w' )
#----------------------------------------
class Wora_Map_Credit
BG_Image = '' # Background Image file name, image must be in folder 'Picture'
# You can leave this as '' for no background
BG_Image_Opacity = 255 # Background Opacity (0 - 255)
Text_Begin_y = 416 # Use 0 - 416: Text will start in the screen
# Use 416+: Text will start below the screen
Text_Scroll_Speed = 2 # Higher this number = Faster
Text_Scroll_Delay = 2 # Delay between each text move (0 for no delay)
Text_Opacity = 220 # Text Opacity
Text_Blend_Type = 0 # 0: Normal, 1: Add, 2: Subtraction
Test_Text = 'I' # Text for test height,
# Change to taller alphabet if height is not right~
#--------------------------
# Start Credit
#--------------------------
Credit= <<_MAP_CREDIT_
<h>HEADLINE
CREDITS HERE
_MAP_CREDIT_
#--------------------------
# End Credit
#--------------------------
#-------------------------------------
# SETUP HEADER TEXT HERE
#-------------------------------------
def header_properties(bitmap)
bitmap.font.name = 'Twilight' # Text Font
bitmap.font.color = Color.new(0, 0, 255, 255) # (Red, Green, Blue, Opacity)
bitmap.font.size = 30 # Text size
bitmap.font.bold = true # Bold Text? (true/false)
bitmap.font.italic = false # Italic Text? (true/false)
bitmap.font.shadow = true # Shadowed Text? (true/false)
@text_outline = Color.new(0,0,0) # nil for no outline, Color.new(r,g,<img src='http://forums.rpgmakerweb.com/public/style_emoticons/<#EMO_DIR#>/cool.png' class='bbc_emoticon' alt='B)' /> for outline
@text_align = 1 # 0: Left, 1: Center, 2: Right
end
#-------------------------------------
# SETUP CONTENT TEXT HERE
#-------------------------------------
def content_properties(bitmap)
bitmap.font.name = 'Tahoma'
bitmap.font.color = Color.new(255, 255, 255, 255)
bitmap.font.size = 22
bitmap.font.bold = true
bitmap.font.italic = false
bitmap.font.shadow = true
@text_outline = nil
@text_align = 1
end
#-----------------------------------------------------------------------
# -END- MAP CREDIT SCRIPT SETUP PART
#===========================================================================
def initialize
@started = false
end
# Delete credit if credit started
def terminate
if @started
if @bg != nil
@bg.bitmap.dispose
@bg.dispose
end
@sprite.bitmap.dispose
@sprite.dispose
@started = false
end
end
# Start Credit
def start(text = Credit, bg = BG_Image)
# Create Background Sprite
if BG_Image != ''
@bg = Sprite.new
@bg.bitmap = Cache.picture(bg)
@bg.opacity = BG_Image_Opacity
@bg.z = 10000
end
# Create Text Sprite
@sprite = Sprite.new
@sprite.x = 122
@sprite.y = 0
@sprite.z = 10001
@sprite.opacity = Text_Opacity
@sprite.blend_type = Text_Blend_Type
# Calculate Credit Height
header_line = 0
content_line = 0
height = 0
text = text.split(/\n/)
text.each do |i|
if i.include?('<h>'); header_line += 1
else; content_line += 1
end
end
@sprite.bitmap = Bitmap.new(1,1)
# Test Header Properties
header_properties(@sprite.bitmap)
header_height = @sprite.bitmap.text_size(Test_Text).height
height += ( header_line * ( header_height ) )
# Test Content Properties
content_properties(@sprite.bitmap)
content_height = @sprite.bitmap.text_size(Test_Text).height
height += ( content_line * ( content_height ) )
@sprite.bitmap.dispose
# Finished Test, Draw Text
@sprite.bitmap = Bitmap.new(300, Text_Begin_y + height + 32)
content_x = 0
content_y = Text_Begin_y
text.each do |i|
# Determine Special Tags
if i.include?('<h>')
i.sub!('<h>', '')
header_properties(@sprite.bitmap)
bitmap_height = header_height
else
content_properties(@sprite.bitmap)
bitmap_height = content_height
end
# Bold Text
if i.include?('<b>')
i.sub!('<b>', ''); @sprite.font.bold = true
elsif i.include?('</b>')
i.sub!('</b>', ''); @sprite.font.bold = false
end
# Italic Text
if i.include?('<i>')
i.sub!('<i>', ''); @sprite.font.italic = true
elsif i.include?('</i>')
i.sub!('</i>', ''); @sprite.font.italic = false
end
# Align Text
if i.include?('<center>')
i.sub!('<center>', ''); @text_align = 1
elsif i.include?('<left>')
i.sub!('<left>', ''); @text_align = 0
elsif i.include?('<right>')
i.sub!('<right>', ''); @text_align = 2
end
if !@text_outline.nil? # Text Outline
ori_color = @sprite.bitmap.font.color.clone
@sprite.bitmap.font.color = @text_outline
@sprite.bitmap.draw_text(content_x-1, content_y, @sprite.bitmap.width,
bitmap_height, i, @text_align)
@sprite.bitmap.draw_text(content_x, content_y-1, @sprite.bitmap.width,
bitmap_height, i, @text_align)
@sprite.bitmap.draw_text(content_x, content_y+1, @sprite.bitmap.width,
bitmap_height, i, @text_align)
@sprite.bitmap.draw_text(content_x+1, content_y, @sprite.bitmap.width,
bitmap_height, i, @text_align)
@sprite.bitmap.font.color = ori_color
end
# Draw Text
@sprite.bitmap.draw_text(content_x, content_y, @sprite.bitmap.width,
bitmap_height, i, @text_align)
content_y += bitmap_height
end
@delay = 0
@started = true
end
# Update credit if credit started~
def update
if @started
if @delay > 0
@delay -= 1
return
else
@sprite.oy += Text_Scroll_Speed
@delay += Text_Scroll_Delay
end
end
end
end
#----------------------------------------
# Plug Credit to Map >_> <img src='http://forums.rpgmakerweb.com/public/style_emoticons/<#EMO_DIR#>/dry.png' class='bbc_emoticon' alt='<_<' />~
#----------------------------------------
class Scene_Map < Scene_Base
attr_reader :credit
alias wor_mapcre_scemap_str start
alias wor_mapcre_scemap_upd update
alias wor_mapcre_scemap_ter terminate
def start
@credit = Wora_Map_Credit.new # Create Credit
wor_mapcre_scemap_str
end
def update
@credit.update # Update Credit
wor_mapcre_scemap_upd
end
def terminate
@credit.terminate # Dispose Credit
wor_mapcre_scemap_ter
end
end[/pre]
|
|



 写轮眼
写轮眼
 提升卡
提升卡 沉默号角
沉默号角 喧嚣号角
喧嚣号角 变色卡
变色卡 升龙剑
升龙剑