| 赞 | 20 |
| VIP | |
| 好人卡 | |
| 积分 | 14 |
| 经验 | |
| 最后登录 | 2020-6-11 |
| 在线时间 | 2881 小时 |
闇吼者の災悪眷族
- 梦石
- 0
- 星屑
- 1366
- 在线时间
- 2881 小时
- 注册时间
- 2014-7-29
- 回帖
- 6408
|
 发表于 2014-9-19 11:55:27
|
显示全部楼层
发表于 2014-9-19 11:55:27
|
显示全部楼层
本帖最后由 三途亚梦 于 2014-9-19 13:43 编辑
Code Crush的这个啊
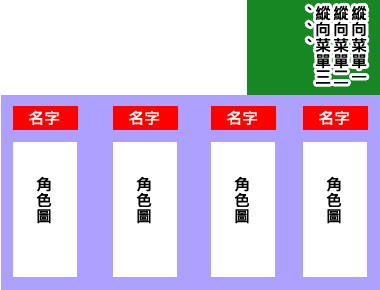
首先menu再定义的那个脚本中显示的不是人物头像,而是新增的人物立绘
会从你设置的图中截取一个预设好的高宽度,作为menu中的立绘图像。
首先你找到和风界面的大概第 370 行
[pre lang="ruby" line="1"]draw_actor_face( actor, x+(width-96)/2, y + line_height * 1, width)[/pre]
这句的意思是描绘人物的脸图
把它改成
[pre lang="ruby" line="1"] draw_actor_menu_picture( actor, x, y, width ,height,)[/pre]
这句的意思是描绘人物的立绘
如果不覆盖掉的话就会同时显示脸图和立绘了
然后把 メニュー再定義 中的
下面这段复制到和风界面的大概第 377 和 378行,那2个 end 之间
它的意思是新定义一个描绘指定立绘的图的方法
[pre lang="ruby" line="1"] #--------------------------------------------------------------------------
# ● アクターの立ち絵描画
#--------------------------------------------------------------------------
def draw_actor_menu_picture(actor, x, y, width, height, enabled = true)
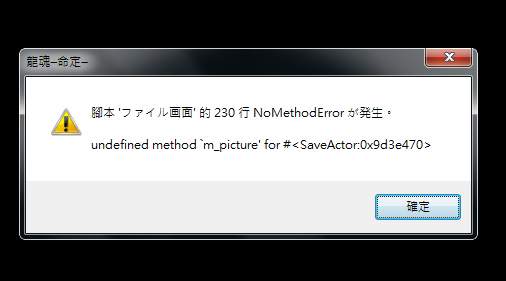
bitmap = Cache.picture(actor.m_picture)
xx = (bitmap.width > width) ? ((bitmap.width - width) / 2) : 0
ww = (bitmap.width > width) ? width : bitmap.width
yy = (bitmap.height > height) ? ((bitmap.height - height) / 2) : 0
hh = (bitmap.height > height) ? height : bitmap.height
rect = Rect.new(xx, yy, ww, hh)
xx = (bitmap.width < width) ? ((width - bitmap.width) / 2) : x
yy = (bitmap.height < height) ? ((height - bitmap.height) / 2) : y
contents.blt(xx, yy, bitmap, rect, enabled ? 255 : translucent_alpha)
bitmap.dispose
end[/pre]
再把下面这段复制到 刚才那2个 end 之后
它的意思是新定义实例变量能够读取人物对应的立绘图
[pre lang="ruby" line="1"]class Game_Actor < Game_Battler
#--------------------------------------------------------------------------
# ● 公開インスタンス変数
#--------------------------------------------------------------------------
attr_accessor :m_picture # menu立ち絵
#--------------------------------------------------------------------------
# ● セットアップ
#--------------------------------------------------------------------------
alias setup_menu_picture setup
def setup(actor_id)
setup_menu_picture(actor_id)
@m_picture = "Actor#{actor_id}"
end
end[/pre]
至于立绘该如何命名如何改变,你需要参考 メニュー再定義 中的注释部分
然后基本上就可以了,如果你觉得立绘描绘的高度和宽度不太符合需要你需要再自己改一改アクターの立ち絵描画中的各项参数。
你可能会发现人物立绘覆盖了人物名字,把
[pre lang="ruby" line="1"] draw_actor_name( actor, x, y + 4, width)
draw_actor_menu_picture( actor, x, y, width ,height,)[/pre]
这两句的位置调换一下,让系统先描绘立绘,再描绘人物名字就行啦。
如果你想进一步像 メニュー再定義 一样文字下面还描绘一个暗色的背景
把下面这些写到 # ● MP の描画 的end 下面
[pre lang="ruby" line="1"] #--------------------------------------------------------------------------
# ● 背景色の取得
#--------------------------------------------------------------------------
def back_color
Color.new(0, 0, 0)
end
#--------------------------------------------------------------------------
# ● ステータス背景描画
#--------------------------------------------------------------------------
def draw_status_back(rect)
b = Bitmap.new(rect.width, rect.height)
r = Rect.new(0, 0, rect.width, rect.height)
b.fill_rect(r, back_color)
contents.blt(rect.x, rect.y, b, r, 128)
b.dispose
end
[/pre]
再把这些替换掉 ● シンプルなステータスの描画 <縦パターン> 的
@jmode = false @jmode = true之间的内容
[pre lang="ruby" line="1"]
draw_actor_menu_picture(actor, x, y + line_height / 2, width, height - (y + line_height / 2))
draw_status_back(Rect.new(x, y + 4, width, line_height))
draw_actor_name( actor, x, y + 4, width)
draw_actor_icons_r(actor, x + 52, y + 4 + line_height * 1, 72)
y = height - line_height * 4 - 4
draw_status_back(Rect.new(x, y, width, line_height * 4 + 4))
draw_actor_level(actor, x, y + 96 + line_height * 2)
draw_actor_hp( actor, x+4, y + line_height * 1, width - 8)
draw_actor_mp( actor, x+4, y + line_height * 2, width - 8)
[/pre] |
评分
-
查看全部评分
|


 写轮眼
写轮眼

 提升卡
提升卡 沉默号角
沉默号角 喧嚣号角
喧嚣号角 变色卡
变色卡 升龙剑
升龙剑


 发表于 2014-9-19 11:08:02